The Message Menu
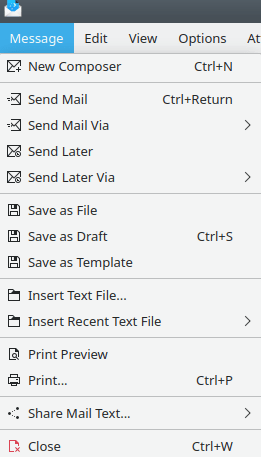
- → (Ctrl+N)
Opens a new composer window so you can create a message.
- → (Ctrl+Return)
Sends the message immediately. If you use SMTP to send your messages and the SMTP server is not reachable, the message will remain in the outbox and you will get an error message. After the connection issues have been resolved, you can send the messages in the outbox using → (in the reader window).
- →
Allows you to specify which outgoing mail server will be used to send the message.
- →
Launches the send later dialog. Please see the Send Later documentation for details.
- →
Allows you to specify which outgoing mail server will be used to send the delayed message.
- →
Saves the message as a file. Three formats are supported: Rich Text (.html), plain text (.txt), and Open Document Format (.odt).
- → (Ctrl+S)
Saves the message in the drafts folder so you can finish it later.
- →
Lets you save your message as a template. Please see Compose from templates for more information.
- →
Inserts a text file into the message text, starting at the cursor position.
- →
Lets you choose from a list of recently inserted text files, and inserts that file into your message. Select to clear the list.
- →
Opens a print preview window and displays your message, formatted for printing.
- → (Ctrl+P)
Formats and prints the message you have composed.
- →
Lets you make a second copy of your message somewhere else. Four options are provided: Nextcloud (an OSS file-sharing app), Pastebin (a freely available web site), Bluetooth, and Email (opens another composer window, and adds the current message to that new message, as an attachment). This option is not available unless the Share Text plugin is active.
- → (Ctrl+W)
Closes this composer window.
The Edit Menu
If the menu item you are looking for is missing, please see the Edit Menu section of the KDE Fundamentals Handbook. The items listed here are KMail specific.
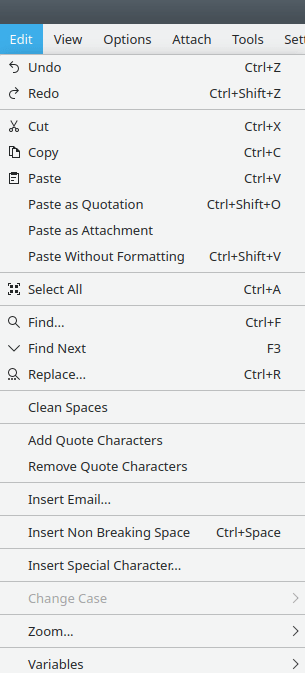
- → (Ctrl+Shift+O)
Pastes the text from the clipboard and marks it as a quotation (i.e., each line preceded by ">" and a space).
- →
Pastes a file that has been copied to the clipboard (e.g., by using the Dolphin file manager) as an attachment.
- → (Ctrl+Shift+V)
Pastes data from the clipboard as plain text, with no HTML formatting.
- →
This option supposedly replaces multiple adjacent newline characters or spaces with single line breaks / spaces, but in testing, it apparently does absolutely nothing.
- →
Prepends each line of the selected text with the quotation indicator (> and a space, by default). If no selection is made, adds the indicator to every line in the message.
- →
Removes the left-most quotation indicator from the selected text.
- →
Displays a list of all the names in your address book, then inserts the chosen email address at the cursor position (after you make a selection and click the button). This option is only available when the plugin has been loaded.
- → (Ctrl+Space)
Inserts a non breaking space at the cursor position. This option is only available when the plugin has been loaded.
- →
Lets you insert a special character at the cursor position. A large number of Unicode characters are made available. This option is only provided if the plugin has been activated.
This menu item was moved to the menu in release 5.17. If you have activated the plugin, and this entry does not appear when KMail is restarted, check the menu.
- →
Helps you modify the capitalization of the selected text. There are four options: Uppercase (capitalizes the selected characters), Lowercase (forces selected text to all lower case), Sentence case (capitalizes the first letter of the selection and makes the rest lower case), and Reverse Case (converts capital letters to lower case, and vice versa). This option is only provided if the plugin has been activated. This menu item remains grayed out until some snippet of text has been selected for modification.
- →
Lets you zoom in or zoom out on the message you are composing. This is the same function appearing as → in the message preview window. This option is not available unless the plugin has been loaded.
- →
Lets you insert the contents of a named field at the cursor position. You may choose among To >, From >, CC >, Attachment >, Date/Time >, and Misc > (which has just one associated submenu item, "Subject"). There is one notable quirk: the date/time displayed in the submenu selections is fixed at the time the Composer window was opened, but the value actually inserted in a message is taken from the system clock.
The View Menu
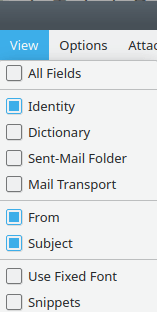
This menu lets you toggle the display of the header fields and a few other items in the composer window. Selected items will be marked (check box colored in) in the menu.
Several options are available:
. Displays all six of the following fields.
. If you have defined more than one identity, this will be a drop down box.
used for spell checking. If multiple dictionaries are installed, this will be a drop down box.
. The
 button appearing on the right when this option is checked opens a folder selection dialog.
. If you have created more than one outgoing account, this will be a drop down box.
. The contents of this field may vary, depending on the Identity you use.
. Use this field to describe your message, briefly.
The To  drop down box is always present at the top of the composer window. Use
it to select CC, BCC, and Reply-To
addresses, as needed. Please see Composer Headers for
further details on message headers.
- →
Uses a fixed width (monospaced) font to display the currently edited message. The particular font to be used can be configured in the Appearance section of KMail's configuration dialog.
- →
Displays a column on the right hand side of the composer window that allows you to use and create snippets. Please see Snippets for more information.
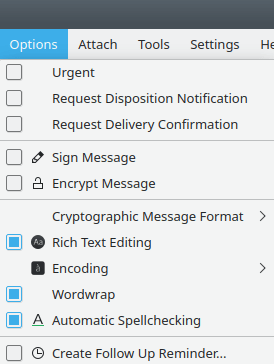
The Options Menu
This menu lets you toggle various options for the current message. Selected items will be marked (check box colored in) in the menu.
- →
Sets the priority of the message to Urgent by inserting two header lines: "X-PRIORITY: 2 (High)" and "Priority: urgent". The receiver's email client must provide support for these headers; otherwise they will have no effect. KMail itself does not support priorities for incoming messages (although you can mark messages as Important).
- →
If you choose this option, KMail will insert a Disposition-Notification-To: header line in the message, which is a request to receive an email notification once your message has been downloaded and read by the recipient. This function must be supported, and enabled by the receiver's email client; otherwise, it will not work.
See Message Disposition Notifications for background information and several ways to customize the read receipts that KMail itself sends in response to a received Disposition-Notification-To: header line.
- →
If you choose this option, KMail will insert a Return-Receipt-To: header line in the message, which is a request to receive an email notification once your message has been uploaded by your email server and delivered to the recipient. This function must be supported by your outgoing email server; otherwise, it will not work.
- →
Digitally signs the message using OpenPGP or an X.509 certificate. You can learn more about this option in the chapter on OpenPGP.
- →
Encrypts the message using OpenPGP or an X.509 certificate. You can learn more about encryption in the chapter on OpenPGP.
- →
Lets you choose the cryptographic message format to use when digitally signing and/or encrypting this message. Please see Cryptographic Message Formats for more information.
- →
Enables Rich Text (i.e., HTML) editing.
- →
Sets the charset encoding of this message. The chosen encoding will be identified by a header line in the outgoing message. You can use Auto in almost every case; KMail will notify you if you must select a different encoding manually.
- →
Toggles the automatic wordwrap feature. You may wish to turn this off when pasting long lines (e.g., URLs) that should not be wrapped.
- →
Toggles automatic spellchecking on or off.
- →
Initiates a dialog allowing you to add a "To Do" item to your calendar. This item is grayed out if the Followup Reminder Agent plugin has not been activated.
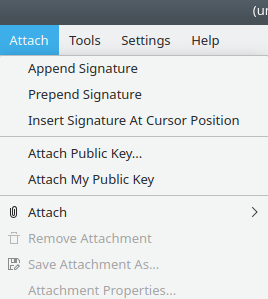
The Attach Menu
This menu lets you select attachment options.
- →
Appends your signature (“footer”) to the end of the message. Please see Configure Identity Signature for details on configuring your signature.
- →
Prepends your signature (“header”) at the beginning of the message.
- →
Inserts your signature at the current cursor location.
- →
Opens the Attach Public OpenPGP Key dialog. Please see Configure Identity Cryptography OpenPGP Signing for details.
- →
Attaches your GnuPG public key, or your X.509 certificate, (i.e., the public key associated with your current identity) to your message.
- → →
Attaches one or more files to the current message. Attachments are encrypted by default (if the message is encrypted). Please see Cryptographic Message Formats for more information on encryption and attachments.
- → →
Creates a ZIP archive containing the selected Directory, and attaches the archive to this message.
- → →
Attaches your vCard to the current message.
- → →
Opens a dialog with KAddressBook that lets you select one or more people (Ctrl and left-click), and then attaches vCards for all those selected.
- → →
If the topmost item saved on the clipboard contains at least two bytes, a file name dialog will open. KMail will create an attachment containing the text from the clipboard, and give the attachment the name you have chosen.
- →
Removes the selected attachment (selected via the attachment area beneath the main composer window).
Note
This menu item, and the next two, will be grayed out until an attachment is selected.
- →
Saves the attachment selected in the attachment window as a file.
- →
Displays the properties of the attachment that has been selected via the attachment window. It also lets you sign/encrypt the attachment, and alter some of its other properties (name, description, MIME type, etc.).
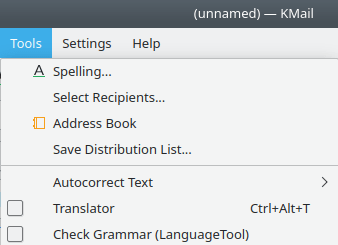
The Tools Menu
If the menu item you are looking for is missing, please see Tools Menu of the KDE Fundamentals. The items listed here are KMail specific.
- →
Opens a Select Recipient dialog, with the contents of all your address books to select from.
- →
Launches the KAddressBook program.
- →
Opens a dialog that lets you save groups of contacts as a single named item. Very handy if you frequently send the same message to all the members of a club, for instance.
- →
Performs autocorrection. You have two options: scan and autocorrect the selected text, or apply autocorrection to the whole message. This menu item will not be present unless the Autocorrection plugin has been loaded, and it won't work unless the Autocorrection function has been enabled on the Composer configuration page.
- → (Ctrl+Alt+T)
Opens the translator window.
- →
Opens the grammar check window and examines your message, highlighting any errors that are found. This feature does not continuously update the scanned text as you type; you should first compose your message, then invoke grammar check. This tool is not available unless the Grammar Check plugin has been activated. Like the Translator function, Grammar Check passes your message through a server (default server: https://languagetool.org/api/v2) on the internet.
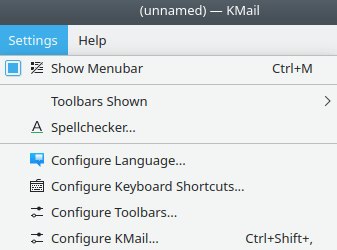
The Settings Menu
If the menu item you seek is missing, please see Settings Menu of the KDE Fundamentals. The items listed here are KMail specific.
- →
Lets you control which toolbars are displayed. You may choose any combination of three options: Main Toolbar (Send, Queue, Rich Text, etc.), HTML Toolbar (Style, Font / Size, etc.), and Text Direction (in case you write in Hebrew, I guess). Note that the HTML Toolbar is easily toggled on and off via the button on the Main Toolbar.
- →
Allows you to configure Sonnet, KDE's spell checker.
